
I include in this section stringers, the long pieces over the upper and lower longerons, the formers and plywood over the longerons from the baggage compartment forward and the wood behind the doors.

These are pieces cut from Douglas Fir blanks. I chose Douglas Fir because it was available locally and didn’t require expensive trucking charges for shipping the long pieces. Also, you end up cutting away over 80% of the original pieces — turning them into sawdust!

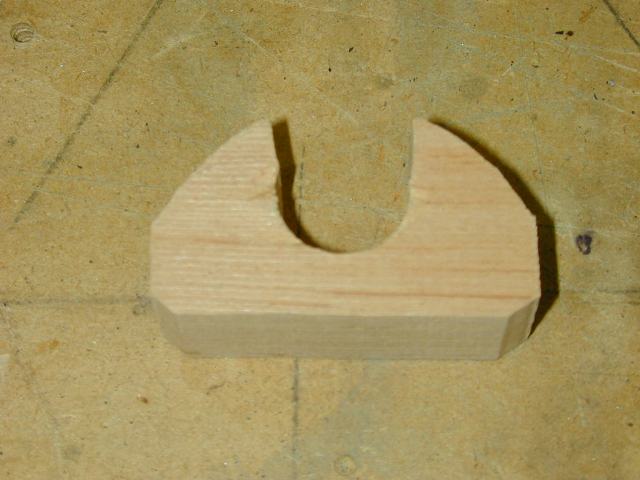
I cut the inside concave area using a table saw and by passing the piece over the saw at an angle to the blade. A separate board as the “ripping fence” and a feather board to keep it going straight. I made many, many passes, each one taking off perhaps less than 1/16” at a time, followed by a small bump up of the blade for the next pass.

About half way there, just showing progress and checking to make sure the cut is centered where I wanted it. The saw did all the work for cutting the nice inside curve. Once the inside concave cut was completed, I made two passes on each side using the table saw cutting to cut some bevel into the outer curve, then finished shaping the outer curve with block planes and the belt sander, constantly checking the shape as I went.

This picture shows just how much curve is in that upper longeron and how much the wood piece has to be pulled down to give that nice flowing curve shape to the top of the fuselage.

It’s really pretty scary pulling that down just waiting for the wood to crack. But as you can see, it made it.
Made a bunch (probably 40) of the wood pieces pictured on the left to help hold and center the longeron wood pieces.

Moving forward on the bottom longerons, they are covered with wood formers and plywood sking. I had to fabricate a bunch of wood formers, each on a different size .


I did this by first making templates from 1/4” thick mdf and gluing them up. These templates were then traced out and cut out using douglas fir.


Soaked the skin in the spa over night and then clamped it in place to dry. Also used a steamer to help persuade it into place. Wet plywood shown clamped to the right.

Finished piece, sanded and poly coated shown below. Just a little fill added to the seam at the notch.

Made a pattern and cut the wood piece that goes below the D window and down to the longeron. Stringers added down the side. Upper longeron pieces left long to be trimmed to match up to trailing edge of wing.

Took the fuselage back up to the hangar and put the wing on. Next step is to reposition the top longeron formers so that they just line up with the trailing edge of the wing. In order to do this I needed to remake half of the little donuts to provide a little stand-off (about 1/4”) up towards the wing.

Notched the top longeron formers up at the trailing edge and cut a cross board to insert there. You can see the 1 degree of dihedral in the trailing edge. Still some fitting to do here, but getting close. I fabricated .063 steel brackets to connect the cross board to the stringers and to the cross tube on the fuselage.
No comments:
Post a Comment